


Wednesday 20-Nov-2013, 09:54 AM
A couple of weeks before SupaNova I was asked to build a nice fresh sticky Grand Moff resin DLT19. This also coincided with some repairs on Phantoms DLT19 which I also had. So I will start a build thread for this and also add some of Phantoms fixes as well.
1. Assess fresh kit that had been delivered. All parts were good with the usual gassing holes and minor cast defects.
![[Image: IMG_1626_zpsb63abf38.jpg]](http://i614.photobucket.com/albums/tt229/Jeeptheone/Star%20Wars%20stuff/IMG_1626_zpsb63abf38.jpg)
2. After a good check of the kit it was off to Masters for the Plastikote grey undercoat, aluminium, matt black and clear coat spray cans.
3. The full resin kit was washed in a soapy warm water mix and then fresh water rinse and left to air dry.
4. Then the fun part begins, removing all the flashing and cast marks, using the scalpel also deepening and highlighting all the grooves and recesses as needed.
![[Image: IMG_1671_zps1c14a7a1.jpg]](http://i614.photobucket.com/albums/tt229/Jeeptheone/Star%20Wars%20stuff/IMG_1671_zps1c14a7a1.jpg)
5. Now time to fill and bog all the holes and imperfections in the stock and receiver, barrel, muzzle and bipod. this bit sucks
![[Image: IMG_1646_zps75acad67.jpg]](http://i614.photobucket.com/albums/tt229/Jeeptheone/Star%20Wars%20stuff/IMG_1646_zps75acad67.jpg)
6. Time to drill all the barrel and muzzle holes and don't forget the harness holes in the barrel and receiver. At this time I drilled out the main shaft hole between the barrel and receiver and measure 100 times and drill once.....
![[Image: IMG_1647_zps25186eb3.jpg]](http://i614.photobucket.com/albums/tt229/Jeeptheone/Star%20Wars%20stuff/IMG_1647_zps25186eb3.jpg)
![[Image: IMG_1644_zps7a782709.jpg]](http://i614.photobucket.com/albums/tt229/Jeeptheone/Star%20Wars%20stuff/IMG_1644_zps7a782709.jpg)
![[Image: IMG_1651_zps196bc628.jpg]](http://i614.photobucket.com/albums/tt229/Jeeptheone/Star%20Wars%20stuff/IMG_1651_zps196bc628.jpg)
7. I usually apply an undercoat in between the hole filling as it brings out the defects better
![[Image: IMG_1693_zpsa32908b5.jpg]](http://i614.photobucket.com/albums/tt229/Jeeptheone/Star%20Wars%20stuff/IMG_1693_zpsa32908b5.jpg)
8. Now time for the pin and glue of the greebs and also the tie wire application on the T-tracks. Take your time here and make even grooves on the t-Tracks to house the wire. I have a tie wire pliers and they work great but use care as too much force will deform the soft resin.
![[Image: IMG_1692_zpsd6dca27c.jpg]](http://i614.photobucket.com/albums/tt229/Jeeptheone/Star%20Wars%20stuff/IMG_1692_zpsd6dca27c.jpg)
![[Image: IMG_1691_zps613e7ee2.jpg]](http://i614.photobucket.com/albums/tt229/Jeeptheone/Star%20Wars%20stuff/IMG_1691_zps613e7ee2.jpg)
![[Image: IMG_1701_zps23908516.jpg]](http://i614.photobucket.com/albums/tt229/Jeeptheone/Star%20Wars%20stuff/IMG_1701_zps23908516.jpg)
![[Image: IMG_1694_zps0b0e2613.jpg]](http://i614.photobucket.com/albums/tt229/Jeeptheone/Star%20Wars%20stuff/IMG_1694_zps0b0e2613.jpg)
![[Image: IMG_1695_zps5c50d9ca.jpg]](http://i614.photobucket.com/albums/tt229/Jeeptheone/Star%20Wars%20stuff/IMG_1695_zps5c50d9ca.jpg)
![[Image: IMG_1699_zps9206e330.jpg]](http://i614.photobucket.com/albums/tt229/Jeeptheone/Star%20Wars%20stuff/IMG_1699_zps9206e330.jpg)
9. Once happy with the level of detail needed then its onto a better undercoat and then the aluminium second coat.
![[Image: IMG_1705_zps24595723.jpg]](http://i614.photobucket.com/albums/tt229/Jeeptheone/Star%20Wars%20stuff/IMG_1705_zps24595723.jpg)
![[Image: IMG_1709_zpsba05ba74.jpg]](http://i614.photobucket.com/albums/tt229/Jeeptheone/Star%20Wars%20stuff/IMG_1709_zpsba05ba74.jpg)
![[Image: IMG_1704_zps06c2d9ea.jpg]](http://i614.photobucket.com/albums/tt229/Jeeptheone/Star%20Wars%20stuff/IMG_1704_zps06c2d9ea.jpg)
![[Image: IMG_1703_zps8a9f6d21.jpg]](http://i614.photobucket.com/albums/tt229/Jeeptheone/Star%20Wars%20stuff/IMG_1703_zps8a9f6d21.jpg)
10. Now time to mask the section between the stock and receiver and start the top coat application. I did 3 top coats all up in matt black.
![[Image: IMG_1710_zps0e8be331.jpg]](http://i614.photobucket.com/albums/tt229/Jeeptheone/Star%20Wars%20stuff/IMG_1710_zps0e8be331.jpg)
![[Image: IMG_1707_zps482de026.jpg]](http://i614.photobucket.com/albums/tt229/Jeeptheone/Star%20Wars%20stuff/IMG_1707_zps482de026.jpg)
![[Image: IMG_1706_zps34e9c7f7.jpg]](http://i614.photobucket.com/albums/tt229/Jeeptheone/Star%20Wars%20stuff/IMG_1706_zps34e9c7f7.jpg)
11. Once happy that all is covered and fully dried then its onto the clear coat. here I did 2 applications liberally over the weapon while in bits to ensure all areas were covered.
![[Image: IMG_1729_zpsaa8d9b0b.jpg]](http://i614.photobucket.com/albums/tt229/Jeeptheone/Star%20Wars%20stuff/IMG_1729_zpsaa8d9b0b.jpg)
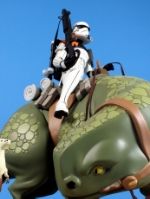
12. Last pics of a pose shot and also the back of the car at SupaNova
![[Image: IMG_1712_zpse61c1404.jpg]](http://i614.photobucket.com/albums/tt229/Jeeptheone/Star%20Wars%20stuff/IMG_1712_zpse61c1404.jpg)
![[Image: IMG_1760_zps326e3fd2.jpg]](http://i614.photobucket.com/albums/tt229/Jeeptheone/Star%20Wars%20stuff/IMG_1760_zps326e3fd2.jpg)
Any queries or questions fire away.....
Terror
1. Assess fresh kit that had been delivered. All parts were good with the usual gassing holes and minor cast defects.
![[Image: IMG_1626_zpsb63abf38.jpg]](http://s614.photobucket.com/user/Jeeptheone/media/Star%20Wars%20stuff/IMG_1626_zpsb63abf38.jpg.html)
2. After a good check of the kit it was off to Masters for the Plastikote grey undercoat, aluminium, matt black and clear coat spray cans.
3. The full resin kit was washed in a soapy warm water mix and then fresh water rinse and left to air dry.
4. Then the fun part begins, removing all the flashing and cast marks, using the scalpel also deepening and highlighting all the grooves and recesses as needed.
![[Image: IMG_1671_zps1c14a7a1.jpg]](http://s614.photobucket.com/user/Jeeptheone/media/Star%20Wars%20stuff/IMG_1671_zps1c14a7a1.jpg.html)
5. Now time to fill and bog all the holes and imperfections in the stock and receiver, barrel, muzzle and bipod. this bit sucks
![[Image: IMG_1646_zps75acad67.jpg]](http://s614.photobucket.com/user/Jeeptheone/media/Star%20Wars%20stuff/IMG_1646_zps75acad67.jpg.html)
6. Time to drill all the barrel and muzzle holes and don't forget the harness holes in the barrel and receiver. At this time I drilled out the main shaft hole between the barrel and receiver and measure 100 times and drill once.....
![[Image: IMG_1647_zps25186eb3.jpg]](http://s614.photobucket.com/user/Jeeptheone/media/Star%20Wars%20stuff/IMG_1647_zps25186eb3.jpg.html)
![[Image: IMG_1644_zps7a782709.jpg]](http://s614.photobucket.com/user/Jeeptheone/media/Star%20Wars%20stuff/IMG_1644_zps7a782709.jpg.html)
![[Image: IMG_1651_zps196bc628.jpg]](http://s614.photobucket.com/user/Jeeptheone/media/Star%20Wars%20stuff/IMG_1651_zps196bc628.jpg.html)
7. I usually apply an undercoat in between the hole filling as it brings out the defects better
![[Image: IMG_1693_zpsa32908b5.jpg]](http://s614.photobucket.com/user/Jeeptheone/media/Star%20Wars%20stuff/IMG_1693_zpsa32908b5.jpg.html)
8. Now time for the pin and glue of the greebs and also the tie wire application on the T-tracks. Take your time here and make even grooves on the t-Tracks to house the wire. I have a tie wire pliers and they work great but use care as too much force will deform the soft resin.
![[Image: IMG_1692_zpsd6dca27c.jpg]](http://s614.photobucket.com/user/Jeeptheone/media/Star%20Wars%20stuff/IMG_1692_zpsd6dca27c.jpg.html)
![[Image: IMG_1691_zps613e7ee2.jpg]](http://s614.photobucket.com/user/Jeeptheone/media/Star%20Wars%20stuff/IMG_1691_zps613e7ee2.jpg.html)
![[Image: IMG_1701_zps23908516.jpg]](http://s614.photobucket.com/user/Jeeptheone/media/Star%20Wars%20stuff/IMG_1701_zps23908516.jpg.html)
![[Image: IMG_1694_zps0b0e2613.jpg]](http://s614.photobucket.com/user/Jeeptheone/media/Star%20Wars%20stuff/IMG_1694_zps0b0e2613.jpg.html)
![[Image: IMG_1695_zps5c50d9ca.jpg]](http://s614.photobucket.com/user/Jeeptheone/media/Star%20Wars%20stuff/IMG_1695_zps5c50d9ca.jpg.html)
![[Image: IMG_1699_zps9206e330.jpg]](http://s614.photobucket.com/user/Jeeptheone/media/Star%20Wars%20stuff/IMG_1699_zps9206e330.jpg.html)
9. Once happy with the level of detail needed then its onto a better undercoat and then the aluminium second coat.
![[Image: IMG_1705_zps24595723.jpg]](http://s614.photobucket.com/user/Jeeptheone/media/Star%20Wars%20stuff/IMG_1705_zps24595723.jpg.html)
![[Image: IMG_1709_zpsba05ba74.jpg]](http://s614.photobucket.com/user/Jeeptheone/media/Star%20Wars%20stuff/IMG_1709_zpsba05ba74.jpg.html)
![[Image: IMG_1704_zps06c2d9ea.jpg]](http://s614.photobucket.com/user/Jeeptheone/media/Star%20Wars%20stuff/IMG_1704_zps06c2d9ea.jpg.html)
![[Image: IMG_1703_zps8a9f6d21.jpg]](http://s614.photobucket.com/user/Jeeptheone/media/Star%20Wars%20stuff/IMG_1703_zps8a9f6d21.jpg.html)
10. Now time to mask the section between the stock and receiver and start the top coat application. I did 3 top coats all up in matt black.
![[Image: IMG_1710_zps0e8be331.jpg]](http://s614.photobucket.com/user/Jeeptheone/media/Star%20Wars%20stuff/IMG_1710_zps0e8be331.jpg.html)
![[Image: IMG_1707_zps482de026.jpg]](http://s614.photobucket.com/user/Jeeptheone/media/Star%20Wars%20stuff/IMG_1707_zps482de026.jpg.html)
![[Image: IMG_1706_zps34e9c7f7.jpg]](http://s614.photobucket.com/user/Jeeptheone/media/Star%20Wars%20stuff/IMG_1706_zps34e9c7f7.jpg.html)
11. Once happy that all is covered and fully dried then its onto the clear coat. here I did 2 applications liberally over the weapon while in bits to ensure all areas were covered.
![[Image: IMG_1729_zpsaa8d9b0b.jpg]](http://s614.photobucket.com/user/Jeeptheone/media/Star%20Wars%20stuff/IMG_1729_zpsaa8d9b0b.jpg.html)
12. Last pics of a pose shot and also the back of the car at SupaNova
![[Image: IMG_1712_zpse61c1404.jpg]](http://s614.photobucket.com/user/Jeeptheone/media/Star%20Wars%20stuff/IMG_1712_zpse61c1404.jpg.html)
![[Image: IMG_1760_zps326e3fd2.jpg]](http://s614.photobucket.com/user/Jeeptheone/media/Star%20Wars%20stuff/IMG_1760_zps326e3fd2.jpg.html)
Any queries or questions fire away.....
Terror
![[Image: imagejpg1_zps8ab58052.jpg]](http://s1328.photobucket.com/user/C3POz/media/imagejpg1_zps8ab58052.jpg.html)


![[Image: gec.png]](https://www.501st.com.au/forum/images/groupimages/gec.png)


 :DW13:


